
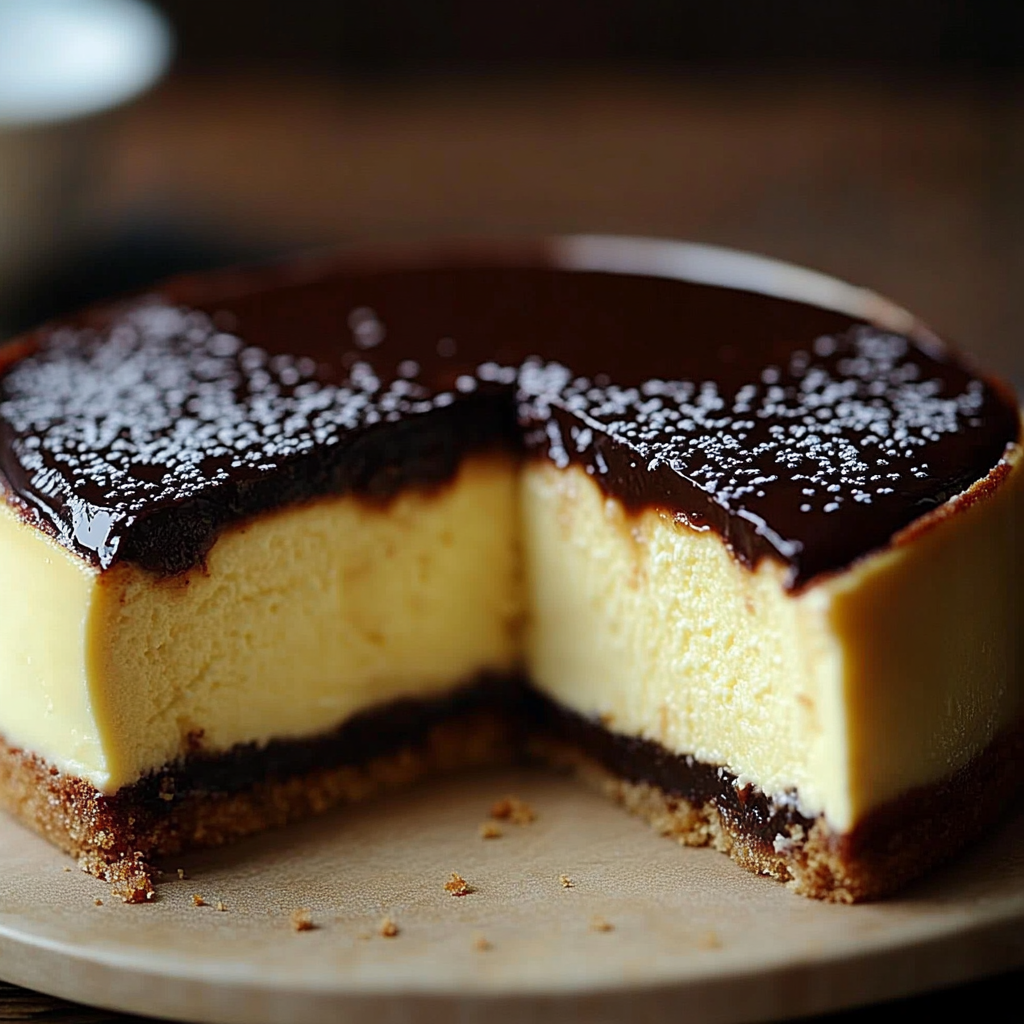
If you are searching for a dessert that combines the richness of cheesecake with the lightness of a classic Boston cream pie, look no further than this delectable Boston Cream Pie Cheesecake-Cake. This innovative recipe is perfect for any occasion, whether it’s a birthday party, holiday gathering, or simply a sweet treat to enjoy at home. With layers of creamy cheesecake nestled between soft vanilla cake and drizzled with silky chocolate ganache, this dessert will leave your taste buds dancing with joy.
The beauty of the Boston Cream Pie Cheesecake-Cake lies not only in its incredible flavor but also in its stunning presentation. As you slice into this masterpiece, you’ll reveal layers that showcase the creamy interior and glossy topping. Each bite offers a perfect balance of sweetness and texture that will have your guests asking for seconds. Plus, it is surprisingly easy to prepare, making it an ideal choice for both novice bakers and seasoned pros.
In this article, we will guide you through all the essential ingredients needed to create your very own Boston Cream Pie Cheesecake-Cake. We’ll also provide step-by-step instructions to ensure your creation turns out beautifully every time. Lastly, we’ll share some serving suggestions and storage tips so you can enjoy this delicious dessert for days to come. Let’s dive right into this delightful recipe!
Main Ingredients
Vanilla Cake Layers
For our Boston Cream Pie Cheesecake-Cake, we need two fluffy vanilla cake layers that serve as the foundation for our dessert. You will require 2 cups of all-purpose flour, 1 ½ cups of granulated sugar, ½ cup of unsalted butter (softened), 1 cup of milk (preferably whole), 3 large eggs, 2 teaspoons of baking powder, and 1 teaspoon of vanilla extract. This combination creates a moist cake that perfectly complements the rich cheesecake filling.
Cream Cheese Filling
The cream cheese filling is where the magic happens in our Boston Cream Pie Cheesecake-Cake. You will need 16 ounces of cream cheese (softened), 1 cup of powdered sugar, 1 teaspoon of vanilla extract, and 1 cup of heavy whipping cream. The cream cheese adds a delightful tanginess while the whipped cream provides lightness to the filling. Together they create a luscious layer that contrasts beautifully with the cake.
Chocolate Ganache Topping
No Boston Cream Pie would be complete without its signature chocolate topping! For this decadent layer, gather 8 ounces of semi-sweet chocolate (chopped) and ½ cup of heavy cream. The ganache is simple yet luxurious; it adds richness and depth to each slice of cheesecake-cake while offering an irresistible glossy finish.
Optional Garnishes
To elevate your dessert even further, consider garnishing with chocolate shavings or fresh berries. These additions not only enhance the visual appeal but also offer extra flavor dimensions that can complement each bite.

How to Prepare Boston Cream Pie Cheesecake-Cake
Step One: Baking the Vanilla Cake Layers
Start by preheating your oven to 350°F (175°C). Grease two round cake pans (9-inch) with butter or cooking spray and line them with parchment paper for easy release after baking. In a large mixing bowl, beat together softened butter and sugar until light and fluffy using an electric mixer—this should take about five minutes on medium speed. Next, add in eggs one at a time while continuing to mix well after each addition.
Once combined thoroughly, stir in vanilla extract along with milk until fully incorporated—avoid overmixing here! In another bowl sift together flour and baking powder before gradually adding this dry mixture into your wet ingredients—mix gently until just combined; lumps are okay! Divide batter evenly between prepared pans before placing them in preheated oven for approximately 25-30 minutes or until toothpick inserted comes out clean.
Allow cakes to cool on wire racks for about ten minutes before removing from pans; let them cool completely before assembling your cheesecake-cake.
Step Two: Preparing the Cream Cheese Filling
While waiting for your cakes to cool completely (which is crucial!), prepare the cream cheese filling by combining softened cream cheese with powdered sugar in a mixing bowl using an electric mixer set on medium speed until smooth—about three minutes should suffice! Add vanilla extract next before continuing to mix well until fully incorporated—this ensures no lumps remain.
In another bowl whisk heavy whipping cream until stiff peaks form; then gently fold this whipped cream into the cream cheese mixture until well blended—this step adds airiness which is vital for texture! Once ready set aside as you focus on assembling layers.
Step Three: Assembling Your Boston Cream Pie Cheesecake-Cake
Now that both your cakes are cooled completely let’s assemble! Start by placing one layer flat-side up onto a serving platter or cake stand; spread half of your prepared cream cheese filling evenly across this first layer using an offset spatula—it’s important not too overload here! Carefully place second layer atop filled first layer (flat side down again) before spreading remaining filling across top layer evenly as well—don’t forget those sides!
Next comes our star player—the chocolate ganache topping! Heat heavy cream over low heat until steaming but not boiling; pour hot cream over chopped semi-sweet chocolate in another bowl allowing it sit undisturbed for about five minutes before whisking vigorously until smooth and glossy forms—a true indulgence awaits!
Pour ganache over assembled cheesecake-cake allowing it drip down sides as desired—you may need to use spatula help guide if necessary! Refrigerate entire masterpiece for at least four hours or overnight if possible allowing everything meld together beautifully—patience truly pays off when creating delightful desserts like these!

Serving and Storing Tips
Serving Suggestions
When it comes time to serve your scrumptious Boston Cream Pie Cheesecake-Cake there are several ways you can present it elegantly while enhancing flavors too! First cut slices carefully using serrated knife ensuring each piece retains layers intact—a clean cut showcases beautiful design within! Consider serving alongside fresh strawberries or raspberries which pair wonderfully against rich chocolaty notes found throughout dessert itself bringing brightness on plate!
Another option is dusting top lightly with cocoa powder or powdered sugar before slicing; this not only enhances visual appeal but also adds subtle sweetness balancing flavors nicely overall! For those who love extra indulgence consider adding dollop whipped cream atop individual servings creating delightful contrast between textures!
Storing Your Dessert
To maintain freshness after preparation proper storage methods are essential ensuring enjoyment lasts longer than just one day! If leftover slices remain wrap tightly in plastic wrap refrigerate up-to five days without losing quality; alternatively place entire uncut cake within airtight container storing same duration preserving all flavors intact as best possible!
If planning ahead feel free bake components ahead store individually wrapped layers frozen up-to three months thawing overnight refrigerator prior assembly day—a great way simplify preparations especially during busy holidays when entertaining guests becomes priority focus instead!
By following these detailed steps you’ll create an unforgettable experience enjoying every last bite deliciously decadent Boston Cream Pie Cheesecake-Cake has offer—all who partake shall surely delight immensely upon indulging sweets crafted lovingly by hands like yours truly!
Double the flavor with this crowd-favorite recipe.
Mistakes to avoid
Not Using Quality Ingredients
When making a Boston Cream Pie Cheesecake-Cake, the quality of your ingredients can significantly impact the final flavor and texture. Always opt for fresh cream cheese, high-quality vanilla extract, and premium chocolate. Using subpar ingredients can lead to a bland taste and a less-than-perfect cheesecake texture. Instead of compromising on quality, invest in the best ingredients you can find. Fresh eggs are also crucial; they create a richer flavor and creamier texture. Remember that each component contributes to the overall result, so prioritize quality throughout your preparation.
Skipping the Chilling Time
A common mistake is not allowing enough chilling time for your Boston Cream Pie Cheesecake-Cake. This dessert requires patience as it needs to set properly in the refrigerator. Skipping or shortening this step can result in a cheesecake that is too soft or won’t hold its shape when sliced. Ideally, allow your cheesecake to chill for at least four hours, although overnight is preferable for optimal firmness and flavor melding. The chilling process not only improves texture but also enhances the taste by letting flavors develop fully.
Overmixing the Batter
Overmixing your batter when preparing a Boston Cream Pie Cheesecake-Cake can introduce excess air into the mixture, leading to cracks during baking. It’s essential to mix just until combined, ensuring you don’t overwork the cream cheese or other ingredients. Use gentle folding motions when incorporating whipped cream into the batter for a light and airy texture without losing stability. Aim for a smooth consistency while being cautious not to whip too vigorously. This way, you’ll achieve that perfect balance between rich creaminess and lightness in each slice.

Keep the deliciousness going with this simple recipe.
Tips and tricks
Use Room Temperature Ingredients
To ensure a smooth batter for your Boston Cream Pie Cheesecake-Cake, always use room temperature ingredients. Cold cream cheese or eggs can create lumps that are difficult to incorporate fully into your mixture. Allow these ingredients to sit out for about 30 minutes before starting your recipe. Room temperature components blend together more easily and help create that velvety texture essential for a successful cheesecake. This simple tip will save you time and effort while preventing frustrating lumps in your final product.
Invest in Quality Pans
Using high-quality baking pans can make all the difference when crafting your Boston Cream Pie Cheesecake-Cake. Opt for non-stick springform pans which facilitate easy release without damaging your cake’s delicate structure. If you prefer using traditional cake pans, make sure to line them with parchment paper to prevent sticking as well. Additionally, consider investing in thick-bottomed pans that promote even heat distribution during baking, reducing the risk of uneven cooking or burning edges.
Layer Flavors Thoughtfully
When preparing your Boston Cream Pie Cheesecake-Cake, layering flavors thoughtfully will enhance its overall appeal. Start with a graham cracker crust infused with melted butter and sugar for added richness. Next, consider adding vanilla bean paste or finely grated lemon zest into your cheesecake mixture for an aromatic touch that elevates each bite. For an extra layer of indulgence, drizzle warm chocolate ganache over the top after chilling; this adds both visual appeal and decadent flavor that perfectly complements the creamy filling.
Here’s another fantastic option you won’t want to miss.
Suggestions for Boston Cream Pie Cheesecake-Cake
Pair with Fresh Berries
Serving your Boston Cream Pie Cheesecake-Cake alongside fresh berries elevates both presentation and taste. Berries such as strawberries, raspberries, or blueberries provide a refreshing contrast to the rich flavors of the cheesecake while adding vibrant color to your dessert plate. The tartness of berries balances sweetness beautifully, enhancing each bite’s overall experience while offering nutritional benefits too! Prepare a quick berry compote by simmering mixed berries with a bit of sugar and lemon juice if you want an extra fruity kick.
Consider Flavor Variations
While traditional flavors are delightful on their own, experimenting with variations can take your Boston Cream Pie Cheesecake-Cake to new heights! Try infusing different extracts like almond or hazelnut into your batter for unique twists on classic flavors; this small change can yield surprising results! You could also replace chocolate ganache with caramel sauce or fruit coulis based on seasonal availability—these alternatives maintain the spirit of this beloved dessert while introducing new elements worth exploring.
Serve Chilled but Not Too Cold
Finding the ideal serving temperature is crucial when enjoying your Boston Cream Pie Cheesecake-Cake. While it should be served chilled for optimal texture, serving it straight from the fridge may mask some flavors due to extreme coldness inhibiting taste buds’ sensitivity. Letting it rest at room temperature for about 15-20 minutes before slicing allows flavors to bloom fully while maintaining its deliciously creamy consistency—offering guests an unforgettable indulgence they’ll rave about!

Spice things up with this exciting recipe!
FAQs for Boston Cream Pie Cheesecake-Cake :
What is a Boston Cream Pie Cheesecake-Cake?
A Boston Cream Pie Cheesecake-Cake combines the classic flavors of Boston cream pie and cheesecake in one delightful dessert. This cake features layers of creamy cheesecake filling, rich chocolate ganache, and fluffy vanilla cake. The combination creates a unique texture and flavor profile that satisfies your sweet tooth. The cheesecake layer provides a rich and tangy contrast to the sweet chocolate, while the cake adds lightness and moisture. This dessert is perfect for special occasions or any time you want to impress your guests with something extraordinary.
How do I store Boston Cream Pie Cheesecake-Cake?
To keep your Boston Cream Pie Cheesecake-Cake fresh, store it in the refrigerator. Place it in an airtight container or cover it tightly with plastic wrap to prevent it from absorbing odors from other foods. The cheesecake can last up to five days in the fridge. If you want to enjoy it later, consider freezing individual slices. Wrap each slice in plastic wrap and then place them in a freezer-safe container. When you’re ready to enjoy a slice, simply thaw it overnight in the refrigerator for the best texture.
Can I make Boston Cream Pie Cheesecake-Cake ahead of time?
Yes, you can prepare your Boston Cream Pie Cheesecake-Cake ahead of time, making it a great option for parties and gatherings. You can bake the cake and prepare the cheesecake filling separately up to two days before serving. Assemble the cake just a few hours before your event for optimal freshness. The chocolate ganache can also be made ahead of time; just reheat it slightly before pouring over the chilled cheesecake-cake for a smooth finish.
What variations can I try with this recipe?
You can easily customize your Boston Cream Pie Cheesecake-Cake by adding different flavors or ingredients. For instance, consider incorporating fruit like raspberries or strawberries for a fresh twist. You could also experiment with flavored extracts like almond or orange to enhance the taste further. If you’re looking for a lighter version, try using reduced-fat cream cheese or Greek yogurt instead of regular cream cheese without sacrificing flavor!
Is Boston Cream Pie Cheesecake-Cake suitable for dietary restrictions?
Yes! You can adapt the recipe to accommodate various dietary needs easily. For gluten-free options, use gluten-free flour instead of regular flour when making the cake layers. To create a dairy-free version, substitute dairy products with plant-based alternatives like coconut cream or nut milk. Vegans can replace eggs with flaxseed meal or applesauce in the cake batter while using vegan cream cheese for the cheesecake layer.
What is the best way to serve Boston Cream Pie Cheesecake-Cake?
Serving your Boston Cream Pie Cheesecake-Cake is just as important as making it! Cut clean slices using a hot knife dipped in warm water; this technique helps achieve neat edges and attractive presentation. Consider garnishing each slice with whipped cream and chocolate shavings for added flair before serving. Pairing this dessert with coffee or tea complements its rich flavors beautifully and enhances your overall dining experience.
Add a little extra variety to your menu with this dish.
Conclusion for Boston Cream Pie Cheesecake-Cake :
In conclusion, the Boston Cream Pie Cheesecake-Cake offers a delightful twist on two beloved desserts, blending rich flavors into one stunning creation. By combining layers of creamy cheesecake filling with moist vanilla cake and decadent chocolate ganache, this dessert will surely impress family and friends alike at gatherings or special occasions. Remember that you can make this cake ahead of time, allowing you more flexibility when hosting.
Don’t forget about customization options! Whether you opt for gluten-free flour or add fresh fruits, there are countless ways to tailor this dessert to suit dietary preferences or personal tastes. Storing leftovers properly ensures that every bite remains delicious well beyond its initial serving.
Ultimately, preparing a Boston Cream Pie Cheesecake-Cake is not only about creating an impressive dish but also about sharing joy through food. Enjoy each step of making this exquisite dessert, from baking to decorating, as much as you relish eating it!
Print
Indulge in Boston Cream Pie Cheesecake-Cake
- Total Time: 1 hour
- Yield: 10 slices 1x
Description
Indulge in the delightful fusion of flavors with our Boston Cream Pie Cheesecake-Cake. This showstopper dessert combines the creamy richness of cheesecake with the light, airy texture of vanilla cake, all topped off with a luscious chocolate ganache. Perfect for any celebration or just a sweet treat at home, this cake will leave your guests raving for more. Each slice reveals layers of decadent filling and moist cake, creating an unforgettable dessert experience that’s surprisingly simple to make.
Ingredients
2 cups all-purpose flour
1 ½ cups granulated sugar
½ cup unsalted butter (softened)
1 cup milk (whole)
3 large eggs
16 ounces cream cheese (softened)
1 cup powdered sugar
1 cup heavy whipping cream
8 ounces semi-sweet chocolate (chopped)
Instructions
Preheat oven to 350°F (175°C). Grease and line two 9-inch round cake pans.
In a bowl, beat butter and sugar until fluffy. Add eggs one at a time, then mix in milk and vanilla.
Sift together flour and baking powder. Gradually combine with wet ingredients until just mixed.
Divide batter between pans and bake for 25-30 minutes or until a toothpick comes out clean. Cool completely.
For the filling, beat cream cheese and powdered sugar until smooth, then fold in whipped cream.
Assemble the cake by layering one vanilla layer, half the filling, the second layer, remaining filling, and top with chocolate ganache made from heated cream poured over chopped chocolate.
Notes
Garnish with chocolate shavings or fresh berries for an elegant touch.
Make ahead by storing unassembled components in the fridge or freezer.
- Prep Time: 30 minutes
- Cook Time: 30 minutes
Nutrition
- Calories: 450
- Fat: 28g
- Carbohydrates: 45g
- Protein: 6g